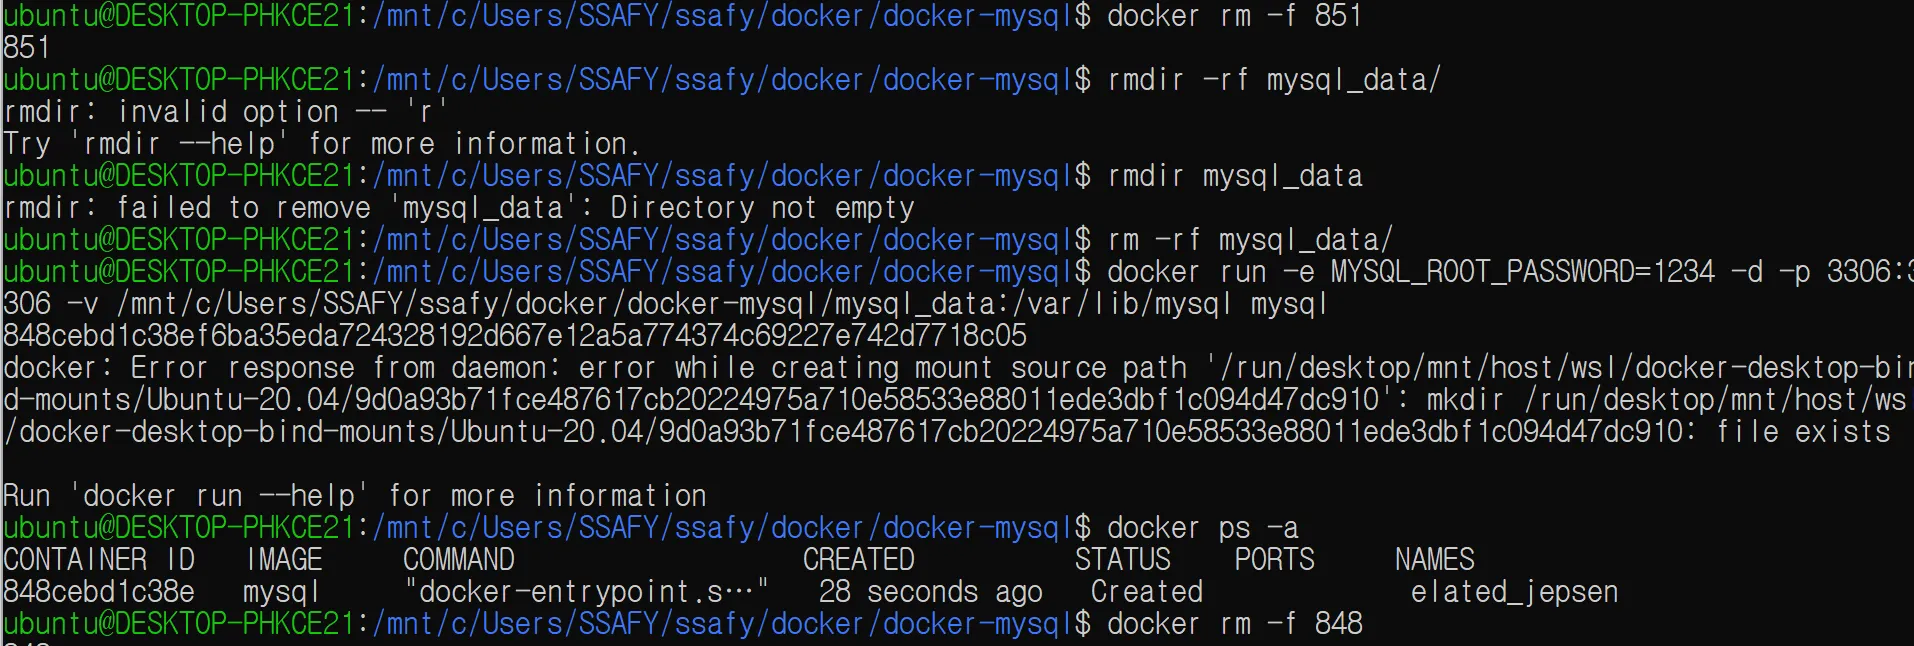
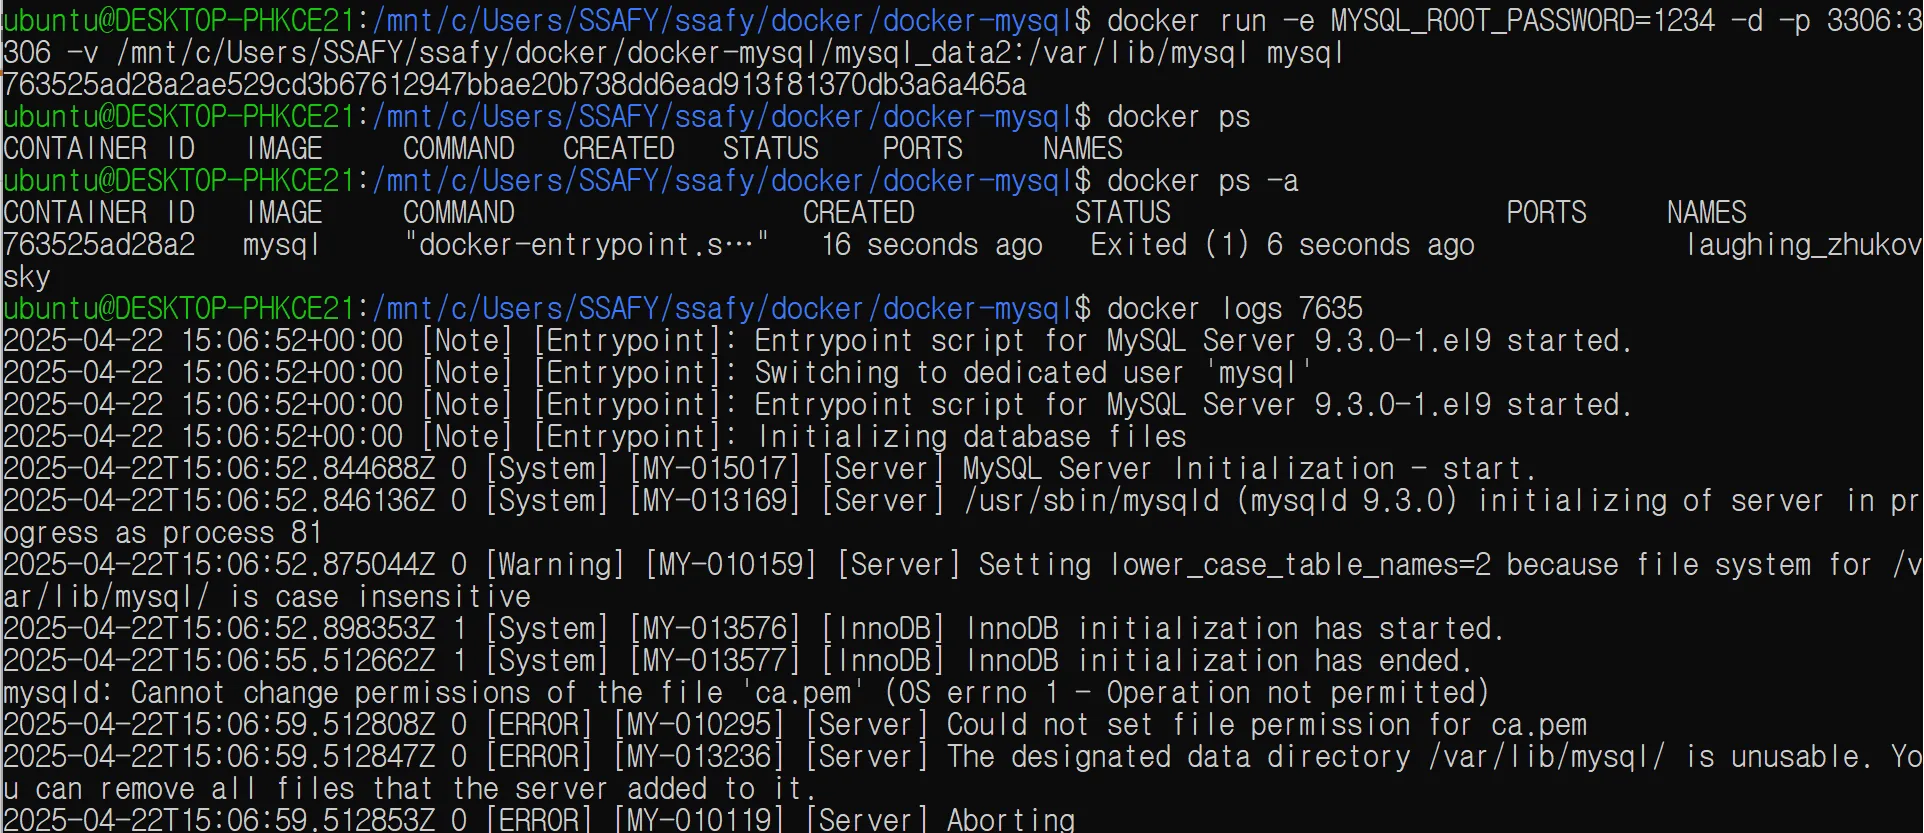
Docker 로그 관련 명령어
모든 로그 조회docker logs {컨테이너 id} 최근 로그 n줄만 조회dokcer logs --tail {표시할 줄 수} [컨테이너 id] 실시간으로 로그 확인docker logs -f {컨테이너 id} 기존 로그 n줄만 조회 + 실시간 로그 확인docker logs -f {표시 줄 수} {컨테이너 id} 실행중인 컨테이너 안으로 들어가기docker exec -it {컨테이너 id} bashexec : 실행중인 컨테이너 안에서 명령어를 실행하겠다-i : interactive 모드. 사용자가 명령어를 입력할 수 있는 옵션-t : 터미널모드. 터미널 화면을 볼 수 있게 하는 옵션bash : bash 셸
2025.04.25
no image
Docker 명령어
이미지 다운로드docker pull # 기본docker pull nginx# 특정 버전 지정하여 다운로드docker pull nginx:stable-perlDockerHub에서 찾아서 저장해준다.기본적으로 최신 버전의 이미지를 다운로드함 이미지 조회docker image ls docker image lsls : list 라는 뜻REPOSITORY: 이미지 명TAG : 이미지 태그명IMAGE ID : 이미지 IDCREATED: 이미지가 Dockerhub에 생성된 날짜 (내가 설치한 날짜가 아님)SIZE: 이미지 크기 이미지 삭제docker image rm # 기본docker image rm nginx# 강제 삭제 (중단된 컨테이너에서 사용중일 경우)docker image rm -f nginxrm: remo..
2025.04.24
no image
Docker란 / 컨테이너(Container)란 / 이미지(Image)란
Docker란각각의 앱을 어디서든 분리된 환경에서 실행할 수 있게 해주는 툴소프트웨어를 “컨테이너”로 포장해 어느 환경에서든 환경 설치 없이 실행할 수 있게 함Docker를 쓰는 이유프로그램 실행을 위해 귀찮은 설치를 일일이 거치지 않아도 된다.일관되게 프로그램 설치가 가능하다프로그램 간 충돌이 발생하지 않는다.=> 어느 컴퓨터 환경에서든 분리된 환경을 만들어 문제 없이 실행 가능하게 해준다! 컨테이너(Container)란?하나의 컴퓨터 환경 내에서 구성된 독립적인 컴퓨터 환경컴퓨터 속 "미니컴퓨터"기존 컴퓨터 환경에 간섭을 받지 않는 독립적인 하나의 컴퓨터 환경이 만들어 일관된 환경 세팅 가능저장공간 독립된다.각 컨테이너마다 고유 네트워크, IP 주소를 갖는다. 이미지(Image)란? 어떠한 소프트웨..
2025.04.23
Jenkins란?
자동으로 빌드하고 배포할 수 있는 자동화 도구공식문서 https://www.jenkins.io/doc/Docker를 통해 설치하거나 JRE(Java Runtime Environment)가 설치된 모든 컴퓨터에서 독립적으로 실행 가능흐름Git에 코드가 올라오면 Webhook을 통해 감지미리 짜놓은 빌드 스크립트(도커파일, docker-compose.yml)를 실행Docker로 컨테이너 이미지를 생성서버에 배포 or DockerHub로 push사용 이유빌드 배포 자동화환경마다 에러 → Docker기반으로 환경 통일테스트 누락 → 테스트 자동화배포 실수 → 안정적 배포사용 흐름GitLab에 코드 PUSHJenkins가 Docker 이미지 생성DockerHub에 pushEC2에 있는 Nginx + Spring ..
2025.04.22
SpringSecurity : 로그인 필터
0. 로그인 과정 1. 로그인 요청 (POST) 2. DelegatingFilterProxy가 요청을 가로챔 3. SecurityFilterChain 내부 여러 필터 중, UsernamePasswordAuthenticationFilter가 실행되어 요청을 받음. 4. AuthenticationManager가 인증을 시도, UserDetailService에서 사용자 정보를 조회 5. 인증 성공하면 SecurityContext에 사용자 정보를 저장하고, JWT를 발급해 응답.  * 용어 설명Delegating Filter Proxy : 건물 입구 보안 게이트.  - 서블릿 컨테이너(Tomcat)에 등록되는 첫 번재 필터. - 들어오는 모든 요청을 Spring Security 필터 체인(SecurityFilt..
2025.03.13
SpringSecurity : 회원가입 로직
JPA를 활용하여 Entity 생성 및 회원가입 로직을 구현한다. 엔티티 생성 및 파일 생성 1. 회원 Entity 생성 (UserEntity)@Entity@Getter@Setterpublic class UserEntity { @Id @GeneratedValue(strategy = GenerationType.IDENTITY) private int id; private String username; private String password; private String role;} 2. UserRepository 생성@Repositorypublic interface UserRepository extends JpaRepository {} 3. application.proper..
2025.03.12
SpringSecurity : SecurityConfig 클래스 작성
Spring Security 6.2.1 버전 기준! 1. 어노테이션 추가 (@Configuration, @EnableWebSecurity)@Configuration@EnableWebSecuritypublic class SecurityConfig {} @Configuration : 스프링 설정 관련 클래스임을 나타내는 어노테이션@EnableWebSecurity : SpringSecurity를 활성화해주는 어노테이션, 시큐리티 관련 설정을 커스텀할 수 있게 하는 역할 2. SecurityFilterChain 작성 @Beanpublic SecurityFilterChain filterChain(HttpSecurity http) throws Exception {} 스프링 시큐리티는 필터를 기반으로 동작한다. 모든..
2025.03.09
백준 7662: 이중 우선순위 큐 [Gold 4] / Java
백준 7662: 이중 우선순위 큐 [Gold 4] / Java https://www.acmicpc.net/problem/7662      문제 설명 이중 우선순위 큐(dual priority queue)는 전형적인 우선순위 큐처럼 데이터를 삽입, 삭제할 수 있는 자료 구조이다. 전형적인 큐와의 차이점은 데이터를 삭제할 때 연산(operation) 명령에 따라 우선순위가 가장 높은 데이터 또는 가장 낮은 데이터 중 하나를 삭제하는 점이다. 이중 우선순위 큐를 위해선 두 가지 연산이 사용되는데, 하나는 데이터를 삽입하는 연산이고 다른 하나는 데이터를 삭제하는 연산이다. 데이터를 삭제하는 연산은 또 두 가지로 구분되는데 하나는 우선순위가 가장 높은 것을 삭제하기 위한 것이고 다른 하나는 우선순위가 가장 낮은 ..
2025.03.08
no image
SpringSecurity : 프로젝트 만들기, 의존성 추가 (시큐리티, JWT)
인텔리제이 얼티메이트 기준으로 작성  1. 프로젝트 만들기(1)JDK 17Java 17 버전  (2) dependencies 설정LombokSpring WebJPAMySQL DriverSpring Security  2. 의존성 주입 (build.gradle) dependencies {// implementation 'org.springframework.boot:spring-boot-starter-data-jpa' implementation 'org.springframework.boot:spring-boot-starter-security' implementation 'org.springframework.boot:spring-boot-starter-web' compileOnly 'org.projectlomb..
2025.03.04
no image
갤럭시워치7 2개월 사용 후기 (Feat. 싸피 성적우수자 시상품)
SSAFY 성적우수자가 되다벌써 1학기가 지났다.Java부터 시작해 HTML, CSS, Javascript, Vue.js 그리고 알고리즘까지 정말 많은 것들을 배운 6개월이었다. 공무원으로 행정업무만 하던 내가 이렇게 IDE를 켜고 코드를 작성하고 들여다보고 있다는게 신기하다. 뭐든 열정적으로 경험하고 배우겠다는 결심으로 공무원을 그만둔만큼, 6개월 간 수업 듣는 것은 물론, 알고리즘 스터디, CS 스터디도  하며 열심히 공부를 했다.  그 결과, 반에서 1등을 해 성적 우수상을 받았고, 1학기 마지막에 관통PJT 에서 2등을 해 프로젝트 우수상까지 받아2개의 상을 받았다! 내가 개발자를 하는 게 맞을까 고민과 걱정이 많았는데, 이렇게 상을 받으며 조금은 안심이 되었다. 그리고 성적우수자에 대한 시상품으..
2025.02.25

Docker 로그 관련 명령어

친환경 개발자
|2025. 4. 25. 02:41

모든 로그 조회

docker logs {컨테이너 id}


최근 로그 n줄만 조회

dokcer logs --tail {표시할 줄 수} [컨테이너 id]


실시간으로 로그 확인

docker logs -f {컨테이너 id}


기존 로그 n줄만 조회 + 실시간 로그 확인

docker logs -f {표시 줄 수} {컨테이너 id}


실행중인 컨테이너 안으로 들어가기

docker exec -it {컨테이너 id} bash
  • exec : 실행중인 컨테이너 안에서 명령어를 실행하겠다
  • -i : interactive 모드. 사용자가 명령어를 입력할 수 있는 옵션
  • -t : 터미널모드. 터미널 화면을 볼 수 있게 하는 옵션
  • bash : bash 셸

Docker 명령어

친환경 개발자
|2025. 4. 24. 18:01

이미지 다운로드

docker pull <이미지명>
# 기본
docker pull nginx

# 특정 버전 지정하여 다운로드
docker pull nginx:stable-perl
  • DockerHub에서 찾아서 저장해준다.
  • 기본적으로 최신 버전의 이미지를 다운로드함


이미지 조회

docker image ls


docker image ls

  • ls : list 라는 뜻
  • REPOSITORY: 이미지 명
  • TAG : 이미지 태그명
  • IMAGE ID : 이미지 ID
  • CREATED: 이미지가 Dockerhub에 생성된 날짜 (내가 설치한 날짜가 아님)
  • SIZE: 이미지 크기


이미지 삭제

docker image rm <이미지명 or 이미지ID>
# 기본
docker image rm nginx

# 강제 삭제 (중단된 컨테이너에서 사용중일 경우)
docker image rm -f nginx

  • rm: remove의 약자
  • 이미지 id 입력 시에는 앞 4글자 정도만 입력해도 알아서 삭제

🪄 중단된 컨테이너에서 사용중인 이미지는 이렇게 에러가 발생


컨테이너 생성

docker create 이미지명[:태그명]
$ docker create nginx

$ docker ps -a # 모든 컨테이너 조회
  • 다운받은 이미지를 바탕으로 컨테이너를 생성.
  • 컨테이너가 실행되진 않는다! 생성만 됨


컨테이너 실행

docker start <컨테이너명 or 컨테이너ID>
$ docker start f8d37


💡컨테이너 생성 + 실행 (+ 이미지 다운로드) 한번에

docker run <컨테이너명 or 컨테이너ID>
$ docker run nginx


🪄 포그라운드 vs 백그라운드

  • 포그라운드: 프로그램이 화면에서 실행. 다른 명령어 칠 수가 없다.
  • 백그라운드: 프로그램이 화면 뒤에서 실행. 다른 명령어 칠 수 있다.
# 포그라운드
docker run nginx
# 백그라운드
docker run -d nginx


컨테이너 조회

docker ps [-a]
# 실행중인 컨테이너 조회
docker ps
# 모든 컨테이너 조회
docker ps -a


컨테이너 중지

docker stop <컨테이너명 or 컨테이너ID>  
docker stop webserver


컨테이너 삭제

docker rm <컨테이너명 or 컨테이너ID>  
docker rm ebaa


Docker란

각각의 앱을 어디서든 분리된 환경에서 실행할 수 있게 해주는 툴

  • 소프트웨어를 “컨테이너”로 포장해 어느 환경에서든 환경 설치 없이 실행할 수 있게 함

Docker를 쓰는 이유

  • 프로그램 실행을 위해 귀찮은 설치를 일일이 거치지 않아도 된다.
  • 일관되게 프로그램 설치가 가능하다
  • 프로그램 간 충돌이 발생하지 않는다.

=> 어느 컴퓨터 환경에서든 분리된 환경을 만들어 문제 없이 실행 가능하게 해준다!


컨테이너(Container)란?

하나의 컴퓨터 환경 내에서 구성된 독립적인 컴퓨터 환경

  • 컴퓨터 속 "미니컴퓨터"
  • 기존 컴퓨터 환경에 간섭을 받지 않는 독립적인 하나의 컴퓨터 환경이 만들어 일관된 환경 세팅 가능
  • 저장공간 독립된다.
  • 각 컨테이너마다 고유 네트워크, IP 주소를 갖는다.


이미지(Image)란?

어떠한 소프트웨어를 실행할 수 있는 설계도(설치환경 + 설정 + 실행 방법)

  • 미니 컴퓨터에 들어가는 닌텐도 칩
  • 프로그램을 실행하는 데 필요한 모든 것을 포함하고 있다.
  • MySQL을 별도로 설치하지 않아도 이미지만 있으면 알아서 컨테이너에서 실행이 가능하다!


컨테이너와 이미지 설명


Jenkins란?

친환경 개발자
|2025. 4. 22. 12:40

자동으로 빌드하고 배포할 수 있는 자동화 도구


공식문서 https://www.jenkins.io/doc/

  • Docker를 통해 설치하거나 JRE(Java Runtime Environment)가 설치된 모든 컴퓨터에서 독립적으로 실행 가능
  • 흐름
    1. Git에 코드가 올라오면 Webhook을 통해 감지
    2. 미리 짜놓은 빌드 스크립트(도커파일, docker-compose.yml)를 실행
    3. Docker로 컨테이너 이미지를 생성
    4. 서버에 배포 or DockerHub로 push
  • 사용 이유
    • 빌드 배포 자동화
    • 환경마다 에러 → Docker기반으로 환경 통일
    • 테스트 누락 → 테스트 자동화
    • 배포 실수 → 안정적 배포
  • 사용 흐름
    1. GitLab에 코드 PUSH
    2. Jenkins가 Docker 이미지 생성
    3. DockerHub에 push
    4. EC2에 있는 Nginx + Spring + DB로 docker-compose up
  • 설치 및 실행
    • 독립 실행형: java -jar jenkins.war 명령어로 실행
    • Docker 컨테이너: Docker를 사용하여 컨테이너로 실행
    • 패키지 매니저: 시스템에 맞는 패키지 매니저를 통해 설치

SpringSecurity : 로그인 필터

친환경 개발자
|2025. 3. 13. 00:39


0. 로그인 과정


1. 로그인 요청 (POST)


2. DelegatingFilterProxy가 요청을 가로챔


3. SecurityFilterChain 내부 여러 필터 중, UsernamePasswordAuthenticationFilter가 실행되어 요청을 받음.


4. AuthenticationManager가 인증을 시도, UserDetailService에서 사용자 정보를 조회


5. 인증 성공하면 SecurityContext에 사용자 정보를 저장하고, JWT를 발급해 응답.


* 용어 설명

Delegating Filter Proxy : 건물 입구 보안 게이트. 

 - 서블릿 컨테이너(Tomcat)에 등록되는 첫 번재 필터.

 - 들어오는 모든 요청을 Spring Security 필터 체인(SecurityFilterChain) 각 검문소로 전달.


SecurityFilterChain : 보안 게이트 내부의 여러 개의 보안 검문소가 모인 곳

 - 여러 보안 검문소가 모인 곳

 - Spring Security에서 여러 개의 보안 필터가 순차적으로 실행되는 체인

 - 로그인 요청, JWT 인증, CSRF 보호 등 여러 보안 검사를 담당하는 필터들을 포함

 - 필터 종류 : UsernamePasswordAuthenticationFilter(아이디/비번 로그인 검사),

                      BasicAuthenticationFilter(HTTP Basic 인증 검사),

                      BearerTokenAuthenticationFilter(JWT 토큰 검사)


UsernamePasswordAuthenticationFilter : 신분증과 비밀번호 확인하는 보안요원 

 - /login 요청을 가로채서 아이디(username)와 비밀번호(password)를 확인

 - AuthenticationManager 에게 검증을 요청


AuthenticationManager : 보안요원이 확인한 정보를 최종 검토하는 보안 관리 부서

 - 검증을 직접 하지는 않고, UserDetailService를 통해 DB에서 사용자 정보를 조회함.


UserDetailService : 회사의 사원 정보 조회 시스템

 - DB에서 username을 기반으로 사용자 정보를 조회

 - JWT방식에서는 CustomUserDetailService로 직접 구현.

 - loadUserByUsername 메서드.


1. LoginFilter 구현


JWT 기반 인증을 사용하기 때문에, 이전에 formLogin()을 비활성화했다.

따라서 UsernamePasswordAuthenticationFilter 대신 우리가 직접 커스텀한 로그인 필터를 구현해야 한다.


여기서 username과 password를 추출하고,

UsernamePasswordAuthenticationToken을 생성하여 AuthenticationManager에 인증 요청을 보낸다.

public class LoginFilter extends UsernamePasswordAuthenticationFilter {

    private final AuthenticationManager authenticationManager;

    public LoginFilter(AuthenticationManager authenticationManager) {
        this.authenticationManager = authenticationManager;
    }

    // 요청을 가로채 권한 검증
    @Override
    public Authentication attemptAuthentication(HttpServletRequest request, HttpServletResponse response) throws AuthenticationException {

        // 클라이언트 요청에서 username과 password 추출
        String username = obtainUsername(request);
        String password = obtainPassword(request);

        // 인증을 위해 스프링 시큐리티의 인증 토큰 생성
        UsernamePasswordAuthenticationToken authToken = new UsernamePasswordAuthenticationToken(username, password, null);

        // AuthenticationManager에게 토큰을 넘겨 인증을 요청
        return authenticationManager.authenticate(authToken);
    }

    // 로그인 성공 시 실행
    @Override
    protected void successfulAuthentication(HttpServletRequest request, HttpServletResponse response, FilterChain chain, Authentication authentication) throws IOException {
		
    }

    // 실패시 실행
    @Override
    protected void unsuccessfulAuthentication(HttpServletRequest request, HttpServletResponse response, AuthenticationException failed) throws IOException {

    }
}


2. SecurityConfig에 로그인필터 등록

    // AuthenticationManager Bean 등록
    @Bean
    public AuthenticationManager authenticationManager(AuthenticationConfiguration configuration) throws Exception {
        return configuration.getAuthenticationManager();
    }

    @Bean
    public SecurityFilterChain filterChain(HttpSecurity http) throws Exception {
        http
            .csrf((auth) -> auth.disable())
            .formLogin((auth) -> auth.disable())
            .httpBasic((auth) -> auth.disable())
            .authorizeHttpRequests((auth) -> auth
                .requestMatchers("/login", "/", "/join").permitAll()
                .anyRequest().authenticated())
            .sessionManagement((session) -> session
                .sessionCreationPolicy(SessionCreationPolicy.STATELESS))
                
                
        // 커스텀한 필터를 등록
        // 생성자 파라미터인 authenticationManager를 추가 등록해줘야 에러 안남.
        http.addFilterAt(new LoginFilter(authenticationManager(authenticationConfiguration), jwtUtil), UsernamePasswordAuthenticationFilter.class);

        return http.build();
    }


SpringSecurity : 회원가입 로직

친환경 개발자
|2025. 3. 12. 23:54


JPA를 활용하여 Entity 생성 및 회원가입 로직을 구현한다.


엔티티 생성 및 파일 생성


1. 회원 Entity 생성 (UserEntity)

@Entity
@Getter
@Setter
public class UserEntity {
    @Id
    @GeneratedValue(strategy = GenerationType.IDENTITY)
    private int id;
    private String username;
    private String password;
    private String role;
}


2. UserRepository 생성

@Repository
public interface UserRepository extends JpaRepository<UserEntity, Integer> {

}


3. application.properties

spring.jpa.hibernate.ddl-auto=create


최초 실행시에만 테이블 생성을 위해 create로 설정.

이후에는 none으로 수정할 것.


회원가입 로직 흐름

회원가입 api 요청[FE] - JoinController - JoinService - UserRepository - DB


1. JoinDTO 생성

@Setter
@Getter
public class JoinDTO {
    private String username;
    private String password;
}


2. JoinController

@Controller
@ResponseBody
public class JoinController {

	// 의존성 주입
    private final JoinService joinService;
    public JoinController(JoinService joinService) {
        this.joinService = joinService;
    }

    @PostMapping("/join")
    public String join(JoinDto joinDto) {
        System.out.println(joinDto.getUsername());
        joinService.joinProcess(joinDto);

        return "joined successfully";
    }
}


3. JoinService

@Service
public class JoinService {

    private final UserRepository userRepository;
    private final BCryptPasswordEncoder bCryptPasswordEncoder;

    public JoinService(UserRepository userRepository, BCryptPasswordEncoder bCryptPasswordEncoder) {

        this.userRepository = userRepository;
        this.bCryptPasswordEncoder = bCryptPasswordEncoder;
    }

    public void joinProcess(JoinDto joinDto) {

        // 이미 존재하는 username인지 확인
        Boolean isExist = userRepository.existsByUsername(joinDto.getUsername());

        if (isExist) {
            return;
        }

		// DB에 저장하기 위한 바구니 (UserEntity) 생성
        UserEntity user = new UserEntity();

        user.setUsername(joinDto.getUsername());
        // 비밀번호는 암호화하여 저장!
        user.setPassword(bCryptPasswordEncoder.encode(joinDto.getPassword()));
        user.setRole("ROLE_ADMIN");	// 임시로 ADMIN 권한 부여

        userRepository.save(user);
    }
}


4. UserRepository

@Repository
public interface UserRepository extends JpaRepository<UserEntity, Integer> {
    Boolean existsByUsername(String username);	// 해당 username을 가진 유저가 존재하는지
}


Spring Security 6.2.1 버전 기준!


1. 어노테이션 추가 (@Configuration, @EnableWebSecurity)

@Configuration
@EnableWebSecurity
public class SecurityConfig {
}


@Configuration : 스프링 설정 관련 클래스임을 나타내는 어노테이션

@EnableWebSecurity : SpringSecurity를 활성화해주는 어노테이션, 시큐리티 관련 설정을 커스텀할 수 있게 하는 역할


2. SecurityFilterChain 작성 

@Bean
public SecurityFilterChain filterChain(HttpSecurity http) throws Exception {
}


스프링 시큐리티는 필터를 기반으로 동작한다. 모든 요청을 시큐리터 필터를 통과하도록 하며, 필터들을 묶어 관리하는 것을 SecurityFilterChain 이라고 함.


* 주요 역할: 로그인했는지 확인, 권한이 있는지 확인, CORS, 세션관리 등


3. CSRF(Cross-Site Request Forgery) 비활성화 

http.csrf((auth) -> auth.disable());


CSRF 공격이란 사용자가 의도하지 않은 요청을 서버가 처리하도록 유도하는 공격이다.
Spring Security는 기본적으로 CSRF 공격을 방어하지만, JWT 방식의 인증 시스템에서는 CSRF 보호가 필요하지 않기 때문에 stateless 상태이고, 따라서 CSRF 보호가 필요 없음.


4. formLogin, httpBasic 비활성화

http.formLogin((auth) -> auth.disable());
http.httpBasic((auth) -> auth.disable());


JWT 방식으로 인증하기 때문에 일반적 로그인 방식인 폼로그인을 사용하지 않고,

Authorization 헤더에 username과 password를 Base64 인코딩하는 방식인 HTTP Basic도 사용하지 않음.


5. 특정 경로별 접근 권한 설정 

http.authorizeHttpRequests((auth) -> auth
            // 로그인, 메인페이지, 가입페이지는 다 들어갈 수 있게
            .requestMatchers("login", "/", "/join").permitAll()
            // 관리자 페이지는 관리자 권한 가진 사람만
            .requestMatchers("/admin").hasRole("ADMIN")
            // 나머지는 막기
            .anyRequest().authenticated());


- permitAll() : 모든 사용자가 로그인하지 않아도 접근가능

- hasRole("권한명") : 특정 권한명을 가진 사용자만 접근 가능

- anyRequest().authenticated() : 위에서 지정한 경로 외에는 모두 로그인해야만 접근 가능


6. 세션 STATELESS 설정

http.sessionManagement((session) -> session
        .sessionCreationPolicy(SessionCreationPolicy.STATELESS));


Spring Security에서는 기본적으로 세션을 생성하여 사용자를 인증하고 관리하나,


여기서는JWT 기반 인증 시스템에서는 세션을 사용하지 않고, 토큰을 기반으로 인증하는 방식을 선택.


SessionCreationPolicy.STATELESS 설정을 통해 Spring Security가 세션을 생성하지 않도록 설정하여,


JWT를 활용한 완전한 무상태(Stateless) 방식의 인증 시스템을 구축할 수 있음


7. 필터체인 반환

return http.build();


build() 를 사용해 설정한 시큐리티 필터 체인을 반환한다.


8. 비밀번호 암호화 설정

@Bean
public BCryptPasswordEncoder bCryptPasswordEncoder() {
    return new BCryptPasswordEncoder();
}


BCryptPasswordEncoder는 Salt 기법을 사용해 같은 비밀번호도 다른 해시 값을 생성하는 암호화 기법을 사용함.


전체 코드

@Configuration
@EnableWebSecurity
public class SecurityConfig {
    // 비밀번호를 hash로 암호화하여 검증. 암호화에 사용할 메서드 구현
    @Bean
    public BCryptPasswordEncoder bCryptPasswordEncoder() {
        return new BCryptPasswordEncoder();
    }


    @Bean
    public SecurityFilterChain filterChain(HttpSecurity http) throws  Exception {
        // csrf disable
        http
                .csrf((auth)  -> auth.disable());
                
        // form 로그인 방식 disable
        http
                .formLogin((auth) -> auth.disable());

        // http basic 인증 방식 disable
        http
                .httpBasic((auth) -> auth.disable());

        // 특정 경로에 인가작업
        http.authorizeHttpRequests((auth) -> auth
                // 로그인, 메인페이지, 가입페이지는 다 들어갈 수 있게
                .requestMatchers("login", "/", "/join").permitAll()
                // 관리자 페이지는 관리자 권한 가진 사람만
                .requestMatchers("/admin").hasRole("ADMIN")
                // 나머지는 막기
                .anyRequest().authenticated());

        // 세션 statless 상태로 설정
        http
                .sessionManagement((session) -> session
                        .sessionCreationPolicy(SessionCreationPolicy.STATELESS));


        return http.build();
    }


}


백준 7662: 이중 우선순위 큐 [Gold 4] / Java


문제 설명


이중 우선순위 큐(dual priority queue)는 전형적인 우선순위 큐처럼 데이터를 삽입, 삭제할 수 있는 자료 구조이다.


전형적인 큐와의 차이점은 데이터를 삭제할 때 연산(operation) 명령에 따라 우선순위가 가장 높은 데이터 또는 가장 낮은 데이터 중 하나를 삭제하는 점이다. 이중 우선순위 큐를 위해선 두 가지 연산이 사용되는데, 하나는 데이터를 삽입하는 연산이고 다른 하나는 데이터를 삭제하는 연산이다. 데이터를 삭제하는 연산은 또 두 가지로 구분되는데 하나는 우선순위가 가장 높은 것을 삭제하기 위한 것이고 다른 하나는 우선순위가 가장 낮은 것을 삭제하기 위한 것이다. 정수만 저장하는 이중 우선순위 큐 Q가 있다고 가정하자. Q에 저장된 각 정수의 값 자체를 우선순위라고 간주하자.


Q에 적용될 일련의 연산이 주어질 때 이를 처리한 후 최종적으로 Q에 저장된 데이터 중 최댓값과 최솟값을 출력하는 프로그램을 작성하라.


입력


입력 데이터는 표준입력을 사용한다.

입력은 T개의 테스트 데이터로 구성된다. 입력의 첫 번째 줄에는 입력 데이터의 수를 나타내는 정수 T가 주어진다. 각 테스트 데이터의 첫째 줄에는 Q에 적용할 연산의 개수를 나타내는 정수 k (k ≤ 1,000,000)가 주어진다. 이어지는 k 줄 각각엔 연산을 나타내는 문자(‘D’ 또는 ‘I’)와 정수 n이 주어진다. ‘I n’은 정수 n을 Q에 삽입하는 연산을 의미한다. 동일한 정수가 삽입될 수 있음을 참고하기 바란다. ‘D 1’는 Q에서 최댓값을 삭제하는 연산을 의미하며, ‘D -1’는 Q 에서 최솟값을 삭제하는 연산을 의미한다. 최댓값(최솟값)을 삭제하는 연산에서 최댓값(최솟값)이 둘 이상인 경우, 하나만 삭제됨을 유념하기 바란다.

만약 Q가 비어있는데 적용할 연산이 ‘D’라면 이 연산은 무시해도 좋다. Q에 저장될 모든 정수는 -231 이상 231 미만인 정수이다.


출력

출력은 표준출력을 사용한다. 각 테스트 데이터에 대해, 모든 연산을 처리한 후 Q에 남아 있는 값 중 최댓값과 최솟값을 출력하라. 두 값은 한 줄에 출력하되 하나의 공백으로 구분하라. 만약 Q가 비어있다면 ‘EMPTY’를 출력하라.


제출 코드


20%에서 오답


우선순위큐를 2개 만들어 1개는 오름차순(pq), 1개는 내림차순(rpq)으로 관리하려 했다.


그래서 값 추가 시에는 각각 추가, 제거 시에는 최소값 제거는 pq에서, 최대값 제거는 rpq에서 제거하는 전략을


세웠는데, 2개의 큐가 동기화되지 않아 삽입과 제거가 무작위로 이루어지면서 무결성이 깨졌다.


public class Main {
	public static void main(String[] args) throws Exception, IOException {
		BufferedReader br = new BufferedReader(new InputStreamReader(System.in));
		PriorityQueue<Integer> pq = new PriorityQueue<>();
		PriorityQueue<Integer> rpq = new PriorityQueue<>(Comparator.reverseOrder());
		
		int T = Integer.parseInt(br.readLine()); // 케이스 수 입력
		// 테스트케이스 순회
		for (int t=1; t<=T; t++) {
			// 연산의 수
			int n = Integer.parseInt(br.readLine());
			
			// 초기화
			pq.clear();
			rpq.clear();
			int size = 0;
			
			// 연산 입력
			for (int i=0; i<n; i++) {
				StringTokenizer st = new StringTokenizer(br.readLine());
				String com = st.nextToken();
				int num = Integer.parseInt(st.nextToken());
				
				
				if (com.equals("I")) {
					pq.add(Integer.valueOf(num));
					rpq.add(Integer.valueOf(num));
					size += 1;
				} else {
					if (size <= 0) continue;
					if (num == -1) {
						pq.poll();
						size -= 1;
					} else {
						rpq.poll();
						size -= 1;
					}
				}
				
			}
			if (size <= 0) System.out.println("EMPTY");
			else if (size <= 1) System.out.println(pq.poll());
			else {
				System.out.print(rpq.poll()+" ");
				System.out.println(pq.poll());
			}
			
			
		}
	}
}​


개선 코드


public class Main {
	public static void main(String[] args) throws Exception, IOException {
		BufferedReader br = new BufferedReader(new InputStreamReader(System.in));
		TreeMap<Integer, Integer> tm = new TreeMap<>();
		
		int T = Integer.parseInt(br.readLine()); // 케이스 수 입력
		// 테스트케이스 순회
		for (int t=1; t<=T; t++) {
			// 연산의 수
			int n = Integer.parseInt(br.readLine());
			
			// 초기화
			tm.clear();
			
			// 연산 입력
			for (int i=0; i<n; i++) {
				StringTokenizer st = new StringTokenizer(br.readLine());
				String com = st.nextToken();
				int num = Integer.parseInt(st.nextToken());
				
				if (com.equals("I")) {
					tm.put(num, tm.getOrDefault(num, 0)+1); // 해당 값에 대해 개수 +1 증가
				} else {
					if (tm.isEmpty()) continue;
					// 최소값 제거
					if (num == -1) {
						if (tm.get(tm.firstKey()) <= 1) {
							tm.remove(tm.firstKey());
						} else {
							tm.put(tm.firstKey(), tm.get(tm.firstKey())-1);
						}
					}
					// 최대값 제거
					else {
						if (tm.get(tm.lastKey()) <= 1) {
							tm.remove(tm.lastKey());
						} else {
							tm.put(tm.lastKey(), tm.get(tm.lastKey())-1);
						}
					}
				}
				
			}
			if (tm.isEmpty()) System.out.println("EMPTY");
			else {
				System.out.print(tm.lastKey()+" ");
				System.out.println(tm.firstKey());
			}
		}
	}
}


TreeMap 자료구조는 자동으로 key값을 기준으로 정렬해준다.


이를 활용해 firstkey, lastkey 메서드를 이용하여 최소값과 최대값을 각각 관리해줄 수 있다!


깨달은 점


TreeMap이라는 자료구조가 생소해 푸는 방법을 생각하기 힘들었다.


자료구조에 대한 이해의 필요성을 깊이 느끼고,


TreeMap에 대해 정리해야겠다!


인텔리제이 얼티메이트 기준으로 작성


1. 프로젝트 만들기

(1)

JDK 17

Java 17 버전


(2) dependencies 설정

Lombok

Spring Web

JPA

MySQL Driver

Spring Security


2. 의존성 주입 (build.gradle)


dependencies {
//	implementation 'org.springframework.boot:spring-boot-starter-data-jpa'
	implementation 'org.springframework.boot:spring-boot-starter-security'
	implementation 'org.springframework.boot:spring-boot-starter-web'
	compileOnly 'org.projectlombok:lombok'
//	runtimeOnly 'com.mysql:mysql-connector-j'
	annotationProcessor 'org.projectlombok:lombok'
	testImplementation 'org.springframework.boot:spring-boot-starter-test'
	testImplementation 'org.springframework.security:spring-security-test'
	testRuntimeOnly 'org.junit.platform:junit-platform-launcher'

	implementation 'io.jsonwebtoken:jjwt-api:0.12.3'
	implementation 'io.jsonwebtoken:jjwt-impl:0.12.3'
	implementation 'io.jsonwebtoken:jjwt-jackson:0.12.3'
}


mysql connector j 와 starter-data-jpa 의존성은 실행 시 에러 발생할 수 있어 우선 주석 처리


3. Controller 2개 만들기


(1) AdminController

package com.jwt.springjwt.controller;

import org.springframework.stereotype.Controller;
import org.springframework.web.bind.annotation.ResponseBody;

@Controller
@ResponseBody
public class AdminController {

    public String adminP() {
        return "Admin Controller";
    }
}


(2) MainController

package com.jwt.springjwt.controller;

import org.springframework.stereotype.Controller;
import org.springframework.web.bind.annotation.GetMapping;
import org.springframework.web.bind.annotation.ResponseBody;

@Controller
@ResponseBody
public class MainController {

    @GetMapping("/")
    public String mainP() {

        return "Main Controlelr";
    }
}


4. 시큐리티 실행 확인


이런 문구가 나오면 시큐리티 기본 설정 및 정상 실행 성공

SSAFY 성적우수자가 되다

벌써 1학기가 지났다.

Java부터 시작해 HTML, CSS, Javascript, Vue.js 그리고 알고리즘까지 정말 많은 것들을 배운 6개월이었다. 

공무원으로 행정업무만 하던 내가 이렇게 IDE를 켜고 코드를 작성하고 들여다보고 있다는게 신기하다.


뭐든 열정적으로 경험하고 배우겠다는 결심으로 공무원을 그만둔만큼, 6개월 간 수업 듣는 것은 물론, 알고리즘 스터디, CS 스터디도  하며 열심히 공부를 했다. 


그 결과, 반에서 1등을 해 성적 우수상을 받았고, 1학기 마지막에 관통PJT 에서 2등을 해 프로젝트 우수상까지 받아

2개의 상을 받았다!


내가 개발자를 하는 게 맞을까 고민과 걱정이 많았는데, 이렇게 상을 받으며 조금은 안심이 되었다.


그리고 성적우수자에 대한 시상품으로.... 갤럭시 워치 7을 받았다.

기분이 좋아 부모님, 친구들에게 여기저기 자랑하고 다녔다.


2학기도(이미 시작되었지만) 열정 잃지 말고 열심히 해야겠다는 생각을 한다.


갤럭시 워치 7 개봉 및 사용 후기


개봉전 박스부터 영롱하다.


박스 내 구성품은 충전케이블, 워치, 설명서 3개이다.


기존에 나는 갤럭시워치4를 사용하고 있었는데, 달라진 점은 충전케이블이 USB타입에서 C타입으로 변경되었다는 점.


이제는 C타입만 있는 충전기가 너무 많은데, 그에 맞게 너무나 잘 바뀐 것 같다.


기본 스트랩도 굴곡이 있는 타입이라 더 예쁘게 느껴졌다.


전원을 켜면 삼성 로고와 삼성갤럭시 로고가 차례로 나온다.


가장 좋은 점은 부드럽게 슬라이드가 넘어간다는 것이다.


기존에 워치4를 사용할 떄에는 버벅임이 꽤 있었는데, 스마트폰처럼 부드럽게 메뉴 이동이 되고


애니메이션에 버벅임이 없었다.


얼른 스트랩을 구매해서 내 맘대로 시계를 꾸미고 싶다.